Guide to CS:GO Config and Creating Autoexec
By Roger on Oct 26th, 2024, 02:21

CS:GO lets players customize many things in-game. You can change your resolution, video settings, crosshairs, and more. Most of these changes are made on the game's console, where you only need to press the ~ key to toggle it. However, there's one big problem. When you restart the game, your settings often reset, too!
It's frustrating to have to redo everything each time. To fix this, many players use something called an "autoexec." This command saves your particular settings, which means. you don't have to re-enter them every time you play.
An autoexec is a file where you can save your game settings. It can include things like crosshair style, buy binds, and sensitivity. When you start CSGO, the game will load these settings automatically. It is super helpful because you don't have to set everything up again each time.
And there's more! You can use your autoexec anywhere. Just upload your autoexec file if you're on a different computer. It works even on LAN events. Once you add it to the game, you'll have all your usual settings ready.
This step-by-step guide follows on importing configs and making your autoexec file.
Always save or back up your personal autoexec or config file online. This will help ensure that you can still retrieve it if it is accidentally changed, replaced, or deleted.
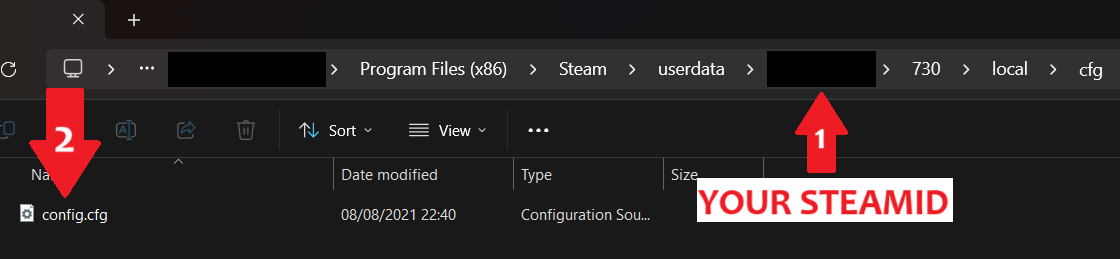
Memorize your Steam ID or keep a copy handy. You can search for it by following this Steam guide.
Always have a backup copy of your config. It will come in handy when you need to revert to it. Place it in an accessible folder or location.
If you want to use a config by your favorite pro player, all you need is their config's downloadable file. These pro-player configs are easily downloadable. To use them, find the link to a CS:GO pro player's page. Once there, click the "config" link, and it will automatically start downloading. Make sure to only download from legitimate sites!
You may replace this config with your own at any time, which is why it is important to keep a backup. The steps are simple: Delete the downloaded configuration and paste your saved backup file back.
It may seem technical, but creating autoexec is simple. All you need to do is follow the proper steps. The initial step is to download Notepad++ or any other text editor. This application can help edit the file you created.
Don't worry; this only takes up a little space as it is a small program. It is also very safe. Millions of users worldwide like it for various purposes. Once you've downloaded it, you may begin the process. Here's how:
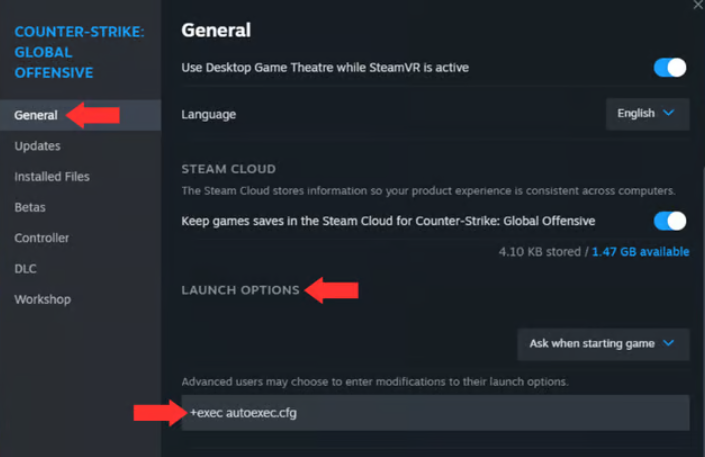
Whenever the game is launched, you must also launch your autoexec. For this, you need to go to the Steam library and follow these steps:
That's it. You are all set!

Roger is an esports journalist and content writer specializing in League of Legends guides, patch analysis, and coaching insights.
View all articles